





I take care of ice baths for a living, so I’ve made just about every maintenance mistake you can imagine. I’ve left the lid off overnight under a frangipani tree, run a chiller with the filter only halfway in and heard it make unhappy noises, and let the water sit a week too long in the April heat—trust me, you don’t want to know what that smells like.
The good news is that keeping your ice bath clean and your chiller running well is actually simple. It just takes about ten minutes a week and a few easy rules. This post covers everything in detail, but if you bought your bath from us, you’ll find a quick reference on our Bath & Chiller Instructions page—the same one your chiller’s QR sticker links to. Feel free to bookmark whichever version you prefer.
How often should you actually clean an ice bath?
It all comes down to one thing: whether you have a chiller running or not.
If you have a chiller, its filter and ozone system clean the water every time it runs, so you can go weeks between water changes with just a little weekly care. Without a chiller, the water isn’t moving or being cleaned, so it gets dirty much faster. Plain, untreated water should be changed daily. If you use a stabiliser and check with test strips, you can stretch it to a few days.
Here’s the rule I always share: trust the test strip, not the calendar. Cold, treated, and covered water stays cleaner than you might think. Testing takes just a minute each week and takes all the guesswork out of it.
What is the weekly routine?
Every bath we sell comes with a cleaning kit, and the routine is just using each item in order. There are six steps:
Skim. The net gets leaves, insects and the odd gecko-adjacent surprise out before they sink and break down.
Test. Dip a strip. It reads sanitiser level, pH and hardness in about a minute. This is the step that makes everything else honest.
Dose. Add more water stabiliser, which is a 6% hydrogen peroxide solution. It leaves no residue and is safe for stainless, acrylic, fibreglass, and inflatable PVC. For your first fill, use about 50 ml per 100 litres, and for weekly top-ups, about 15 ml per 100 litres. For our 320-litre barrel, that’s about 160 ml at the start (about a third of the bottle), then around 50 ml each week. After dosing, test with a strip and adjust if needed. The dosing table is a good starting point, but the strip gives you the exact answer.
Scrub. The silicone-bristle brush reaches the base and won’t scratch anything. Waterline first; that’s where the film forms.
Wipe. Microfibre cloths for the rim, the exterior and the chiller casing.
Check. The floating thermometer reads down to minus five and gives you a second opinion on the chiller’s display. This is helpful if the water feels warmer than the number on the screen.
Two safety reminders about the stabiliser: never mix it with chlorine pool products, and always store the bottle out of sunlight. Sunlight breaks down peroxide, which is another reason to keep the lid on your bath.
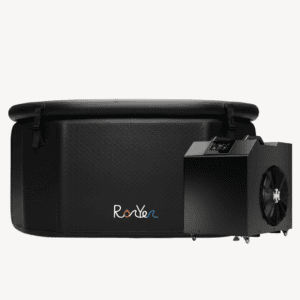
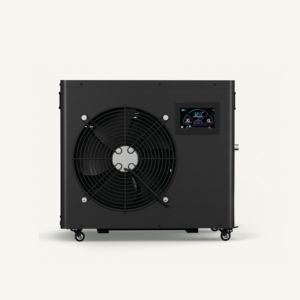
What about the chiller itself?
The chiller doesn’t need much, but what it does need is essential.
Rinse the filter every week. You’ll find it under the cap on top of the chiller. Turn the chiller off, close both water valves, open the cap, take out the paper filter, rinse it, put it back, hand-tighten the cap, open the valves, and turn the chiller back on. It takes about two minutes. Most of the time, when someone says their chiller isn’t cooling well, a clogged filter is the reason.
Never run it dry. The pump is water-cooled by the water it moves. Starve it, and it runs loud, hot and briefly. If you drain the bath, the chiller is off first, every time.
Keep an eye on the water level. The waterline should always be above the chiller’s inlet. If it drops below, the pump pulls in air, the flow drops, and you’ll hear gurgling. If this happens, open the drainer briefly to let the air out, and the flow will return to normal.
Make sure the chiller has space around it to release heat from its condenser. If it’s in a cupboard or pressed against a wall, it will recycle its own hot air and work harder. Leave space on all sides and add shade if possible. This helps the chiller cool the bath more quickly and efficiently.
When you change the water, drain the bath, clean the inside with stabiliser solution and the brush, rinse it out, refill, add stabiliser, and only then turn the chiller back on.
Does the lid really matter that much?
Yes, the lid really does matter. It’s the easiest way to keep maintenance simple. The lid keeps out debris, so you spend less time skimming. It blocks sunlight, helping your sanitiser last longer. It also keeps the cold in, so the chiller doesn’t have to work as hard between uses. Keeping the lid on uses about half a kilowatt-hour a day, which only costs a few baht. Our main rule: always put the lid on when you’re not using the bath.
What’s different about inflatable ice baths?
The water care routine is the same for inflatables. The difference is in caring for the shell, since PVC and drop-stitch fabric are less forgiving than stainless steel.
Use mild soapy water to clean the shell. Avoid solvents, alcohol wipes, and chlorine concentrates, as they can damage the material and seams. The diluted stabiliser is safe in the water, but if you’re cleaning the seams directly, dilute it first instead of using it straight.
Start by scrubbing the seams and creases, since mould often grows in the folds. The silicone brush is perfect for this. Rinse out the drain valve every time you change the water. Keep the bath shaded to prevent the fabric from fading and the water from warming up. If you deflate it for storage, make sure it’s completely dry before folding it up. If you put it away damp, it will come out with spots, and you’ll only need to learn that lesson once.
What does ice do to the maintenance routine?
It’s easy to forget that melting ice adds new water to your bath. Even a few bags can make a difference and dilute the stabiliser you’ve added. After adding a lot of ice, test the water with a strip and top up the stabiliser if needed. That’s all you need to do, but skipping this step is how a clean bath can slowly get out of balance.
The short version
Each week: skim, test, dose, scrub, wipe, check, and rinse the chiller’s filter. Always keep the lid on, never let the chiller run dry, keep the waterline above the inlet, and make sure there’s air around the condenser. Change the water when the test strip tells you, not by the calendar. You can find all these steps in quick-reference form at ronyen.com/bath-chiller-instructions. When you need more stabiliser or test strips, the Ice Bath Cleaning Kit costs ฿1,490 and works for all types of baths, from stainless to inflatable.
FAQ
Q: How often should I change the water in my ice bath?
A: With a chiller running filtration and ozone, a fill lasts weeks with weekly upkeep. Without a chiller, plain water needs changing daily, and stabilised, tested water lasts a few days. Let the test strip decide rather than the calendar.
Q: What chemicals are safe to use in an ice bath?
A: We use a 6% hydrogen peroxide water stabiliser. It is residue-free and safe for stainless, acrylic, fibreglass and inflatable PVC baths. Never mix it with chlorine pool products, and store it out of sunlight.
Q: How do I clean my chiller’s filter?
A: Weekly. Power the chiller off, close both water valves, open the cap on top of the chiller, rinse the paper filter element, reseat it, hand-tighten, reopen the valves and power back on. It takes about two minutes.
Q: Why is my chiller not cooling properly?
A: The usual suspects in order: a clogged filter (rinse it), blocked airflow around the condenser (give it clear space on all sides), or trapped air when the flow reading drops (open the drainer briefly to bleed it). If the bath’s waterline sits below the chiller’s inlet, raise the water level.
Q: Can I leave my chiller running all the time?
A: Yes. With the lid on, holding temperature costs roughly half a kilowatt-hour a day. Many owners schedule it through the app instead, for example on at 5 am and off after the evening session, which is a noise preference more than a cost one.